
Real data in Framer: Weather
Nov 1, 2022
In the second post, we will use real API data to make a weather widget. We will get the API from OpenWeather and then use it by importing “openweather-api-node” in Override, using the NPM import feature of Framer.
The Weather UI
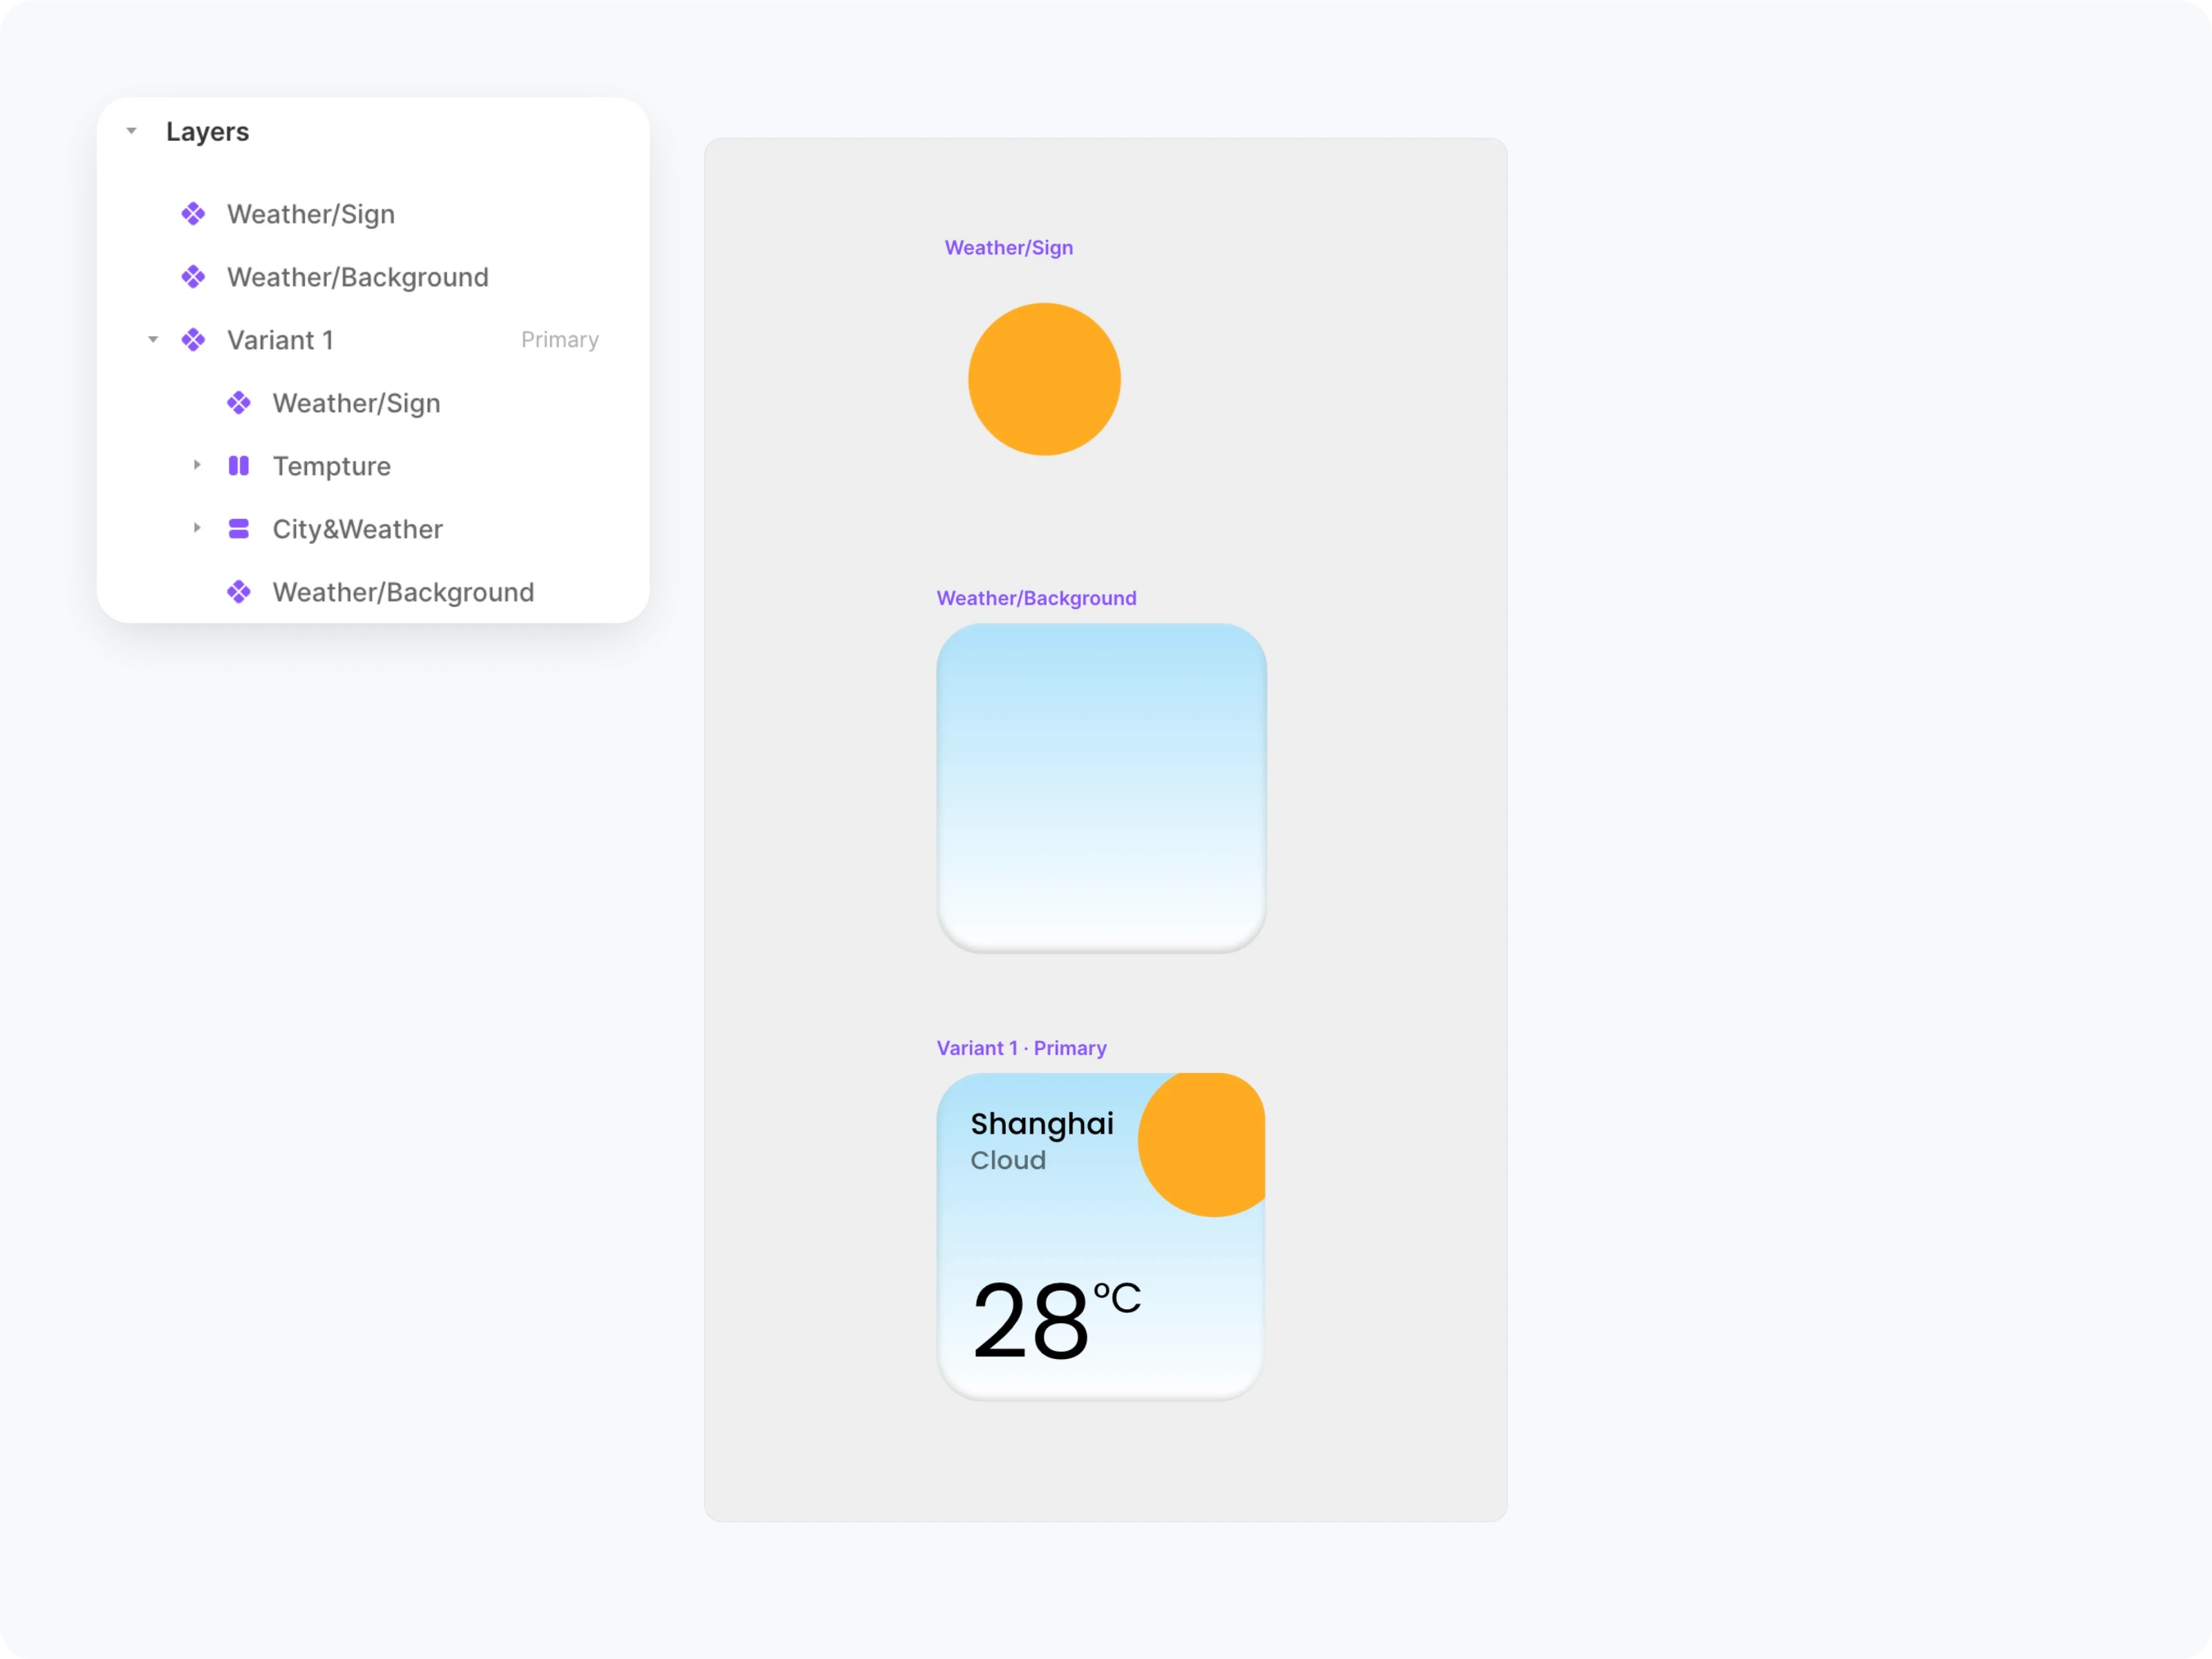
First, we need to create a UI for the weather component, which contains the city, weather, weather symbols, temperature and background. In this case, we will create the weather symbol and background as separate components, so that we can easily modify the style of the widget.
Weather symbol and background
Create weather symbols and backgrounds as separate components and name **Variant** the corresponding weather (these weather names are the same as the names provided by the API).
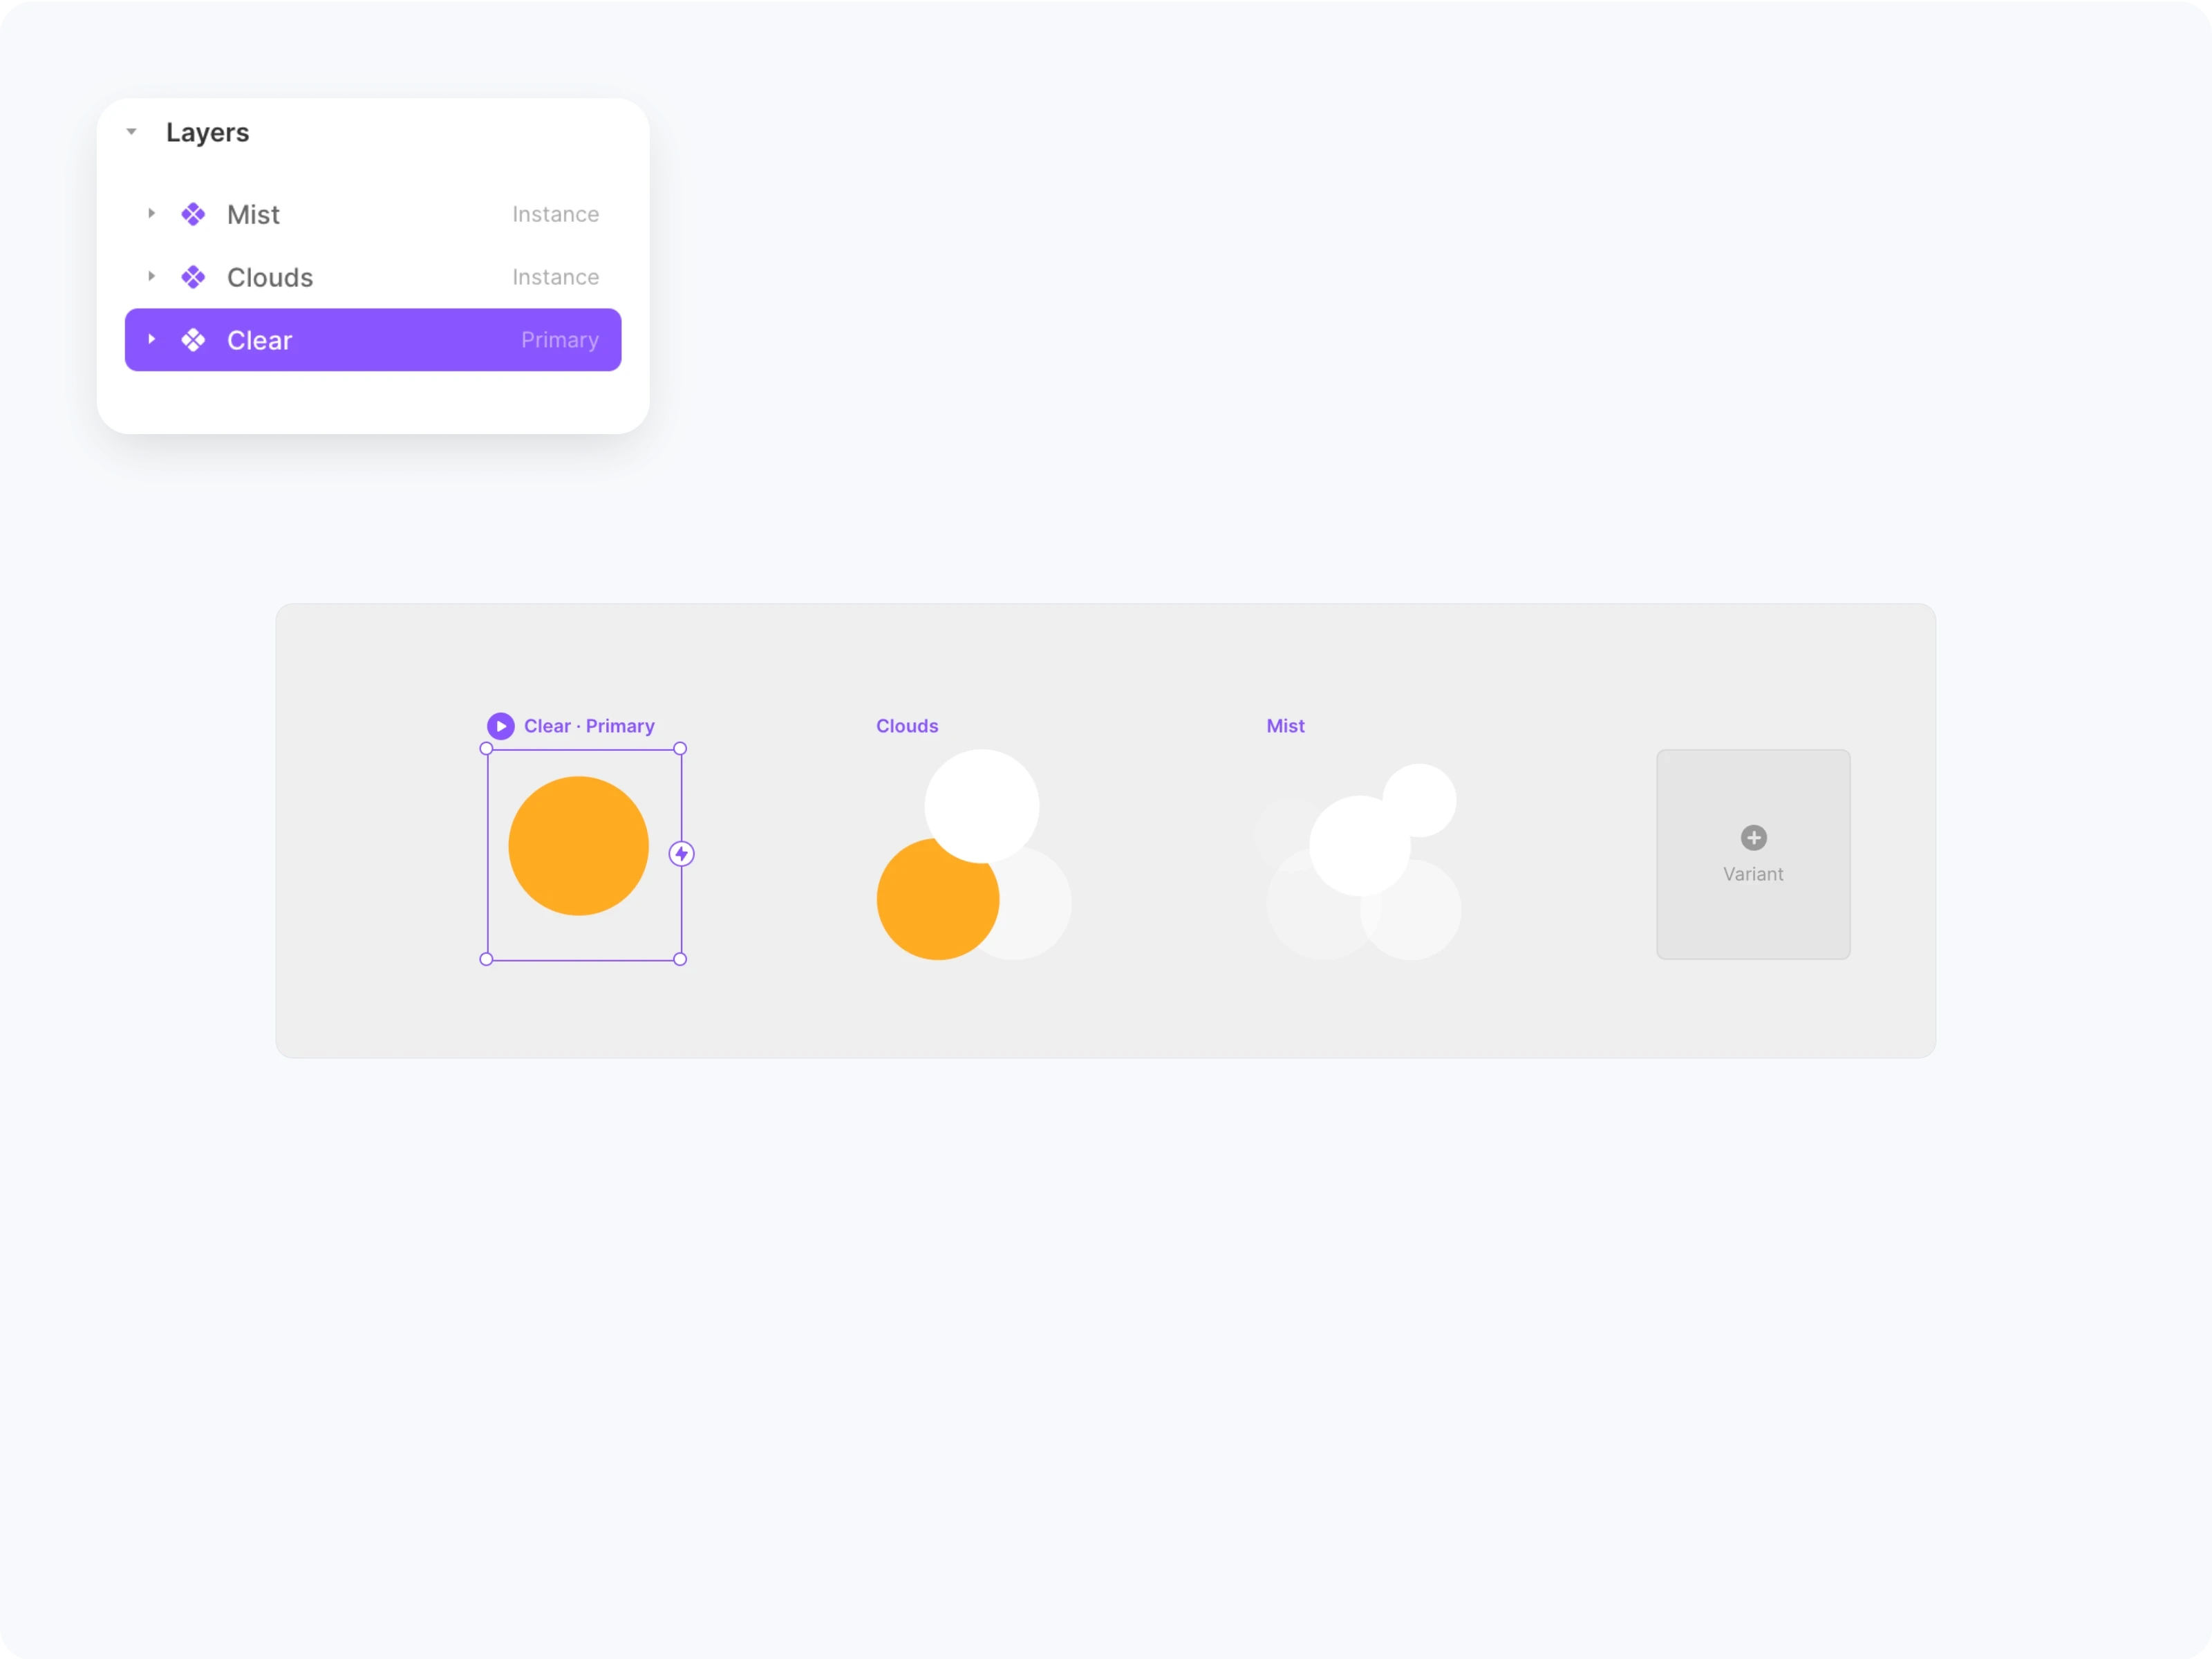
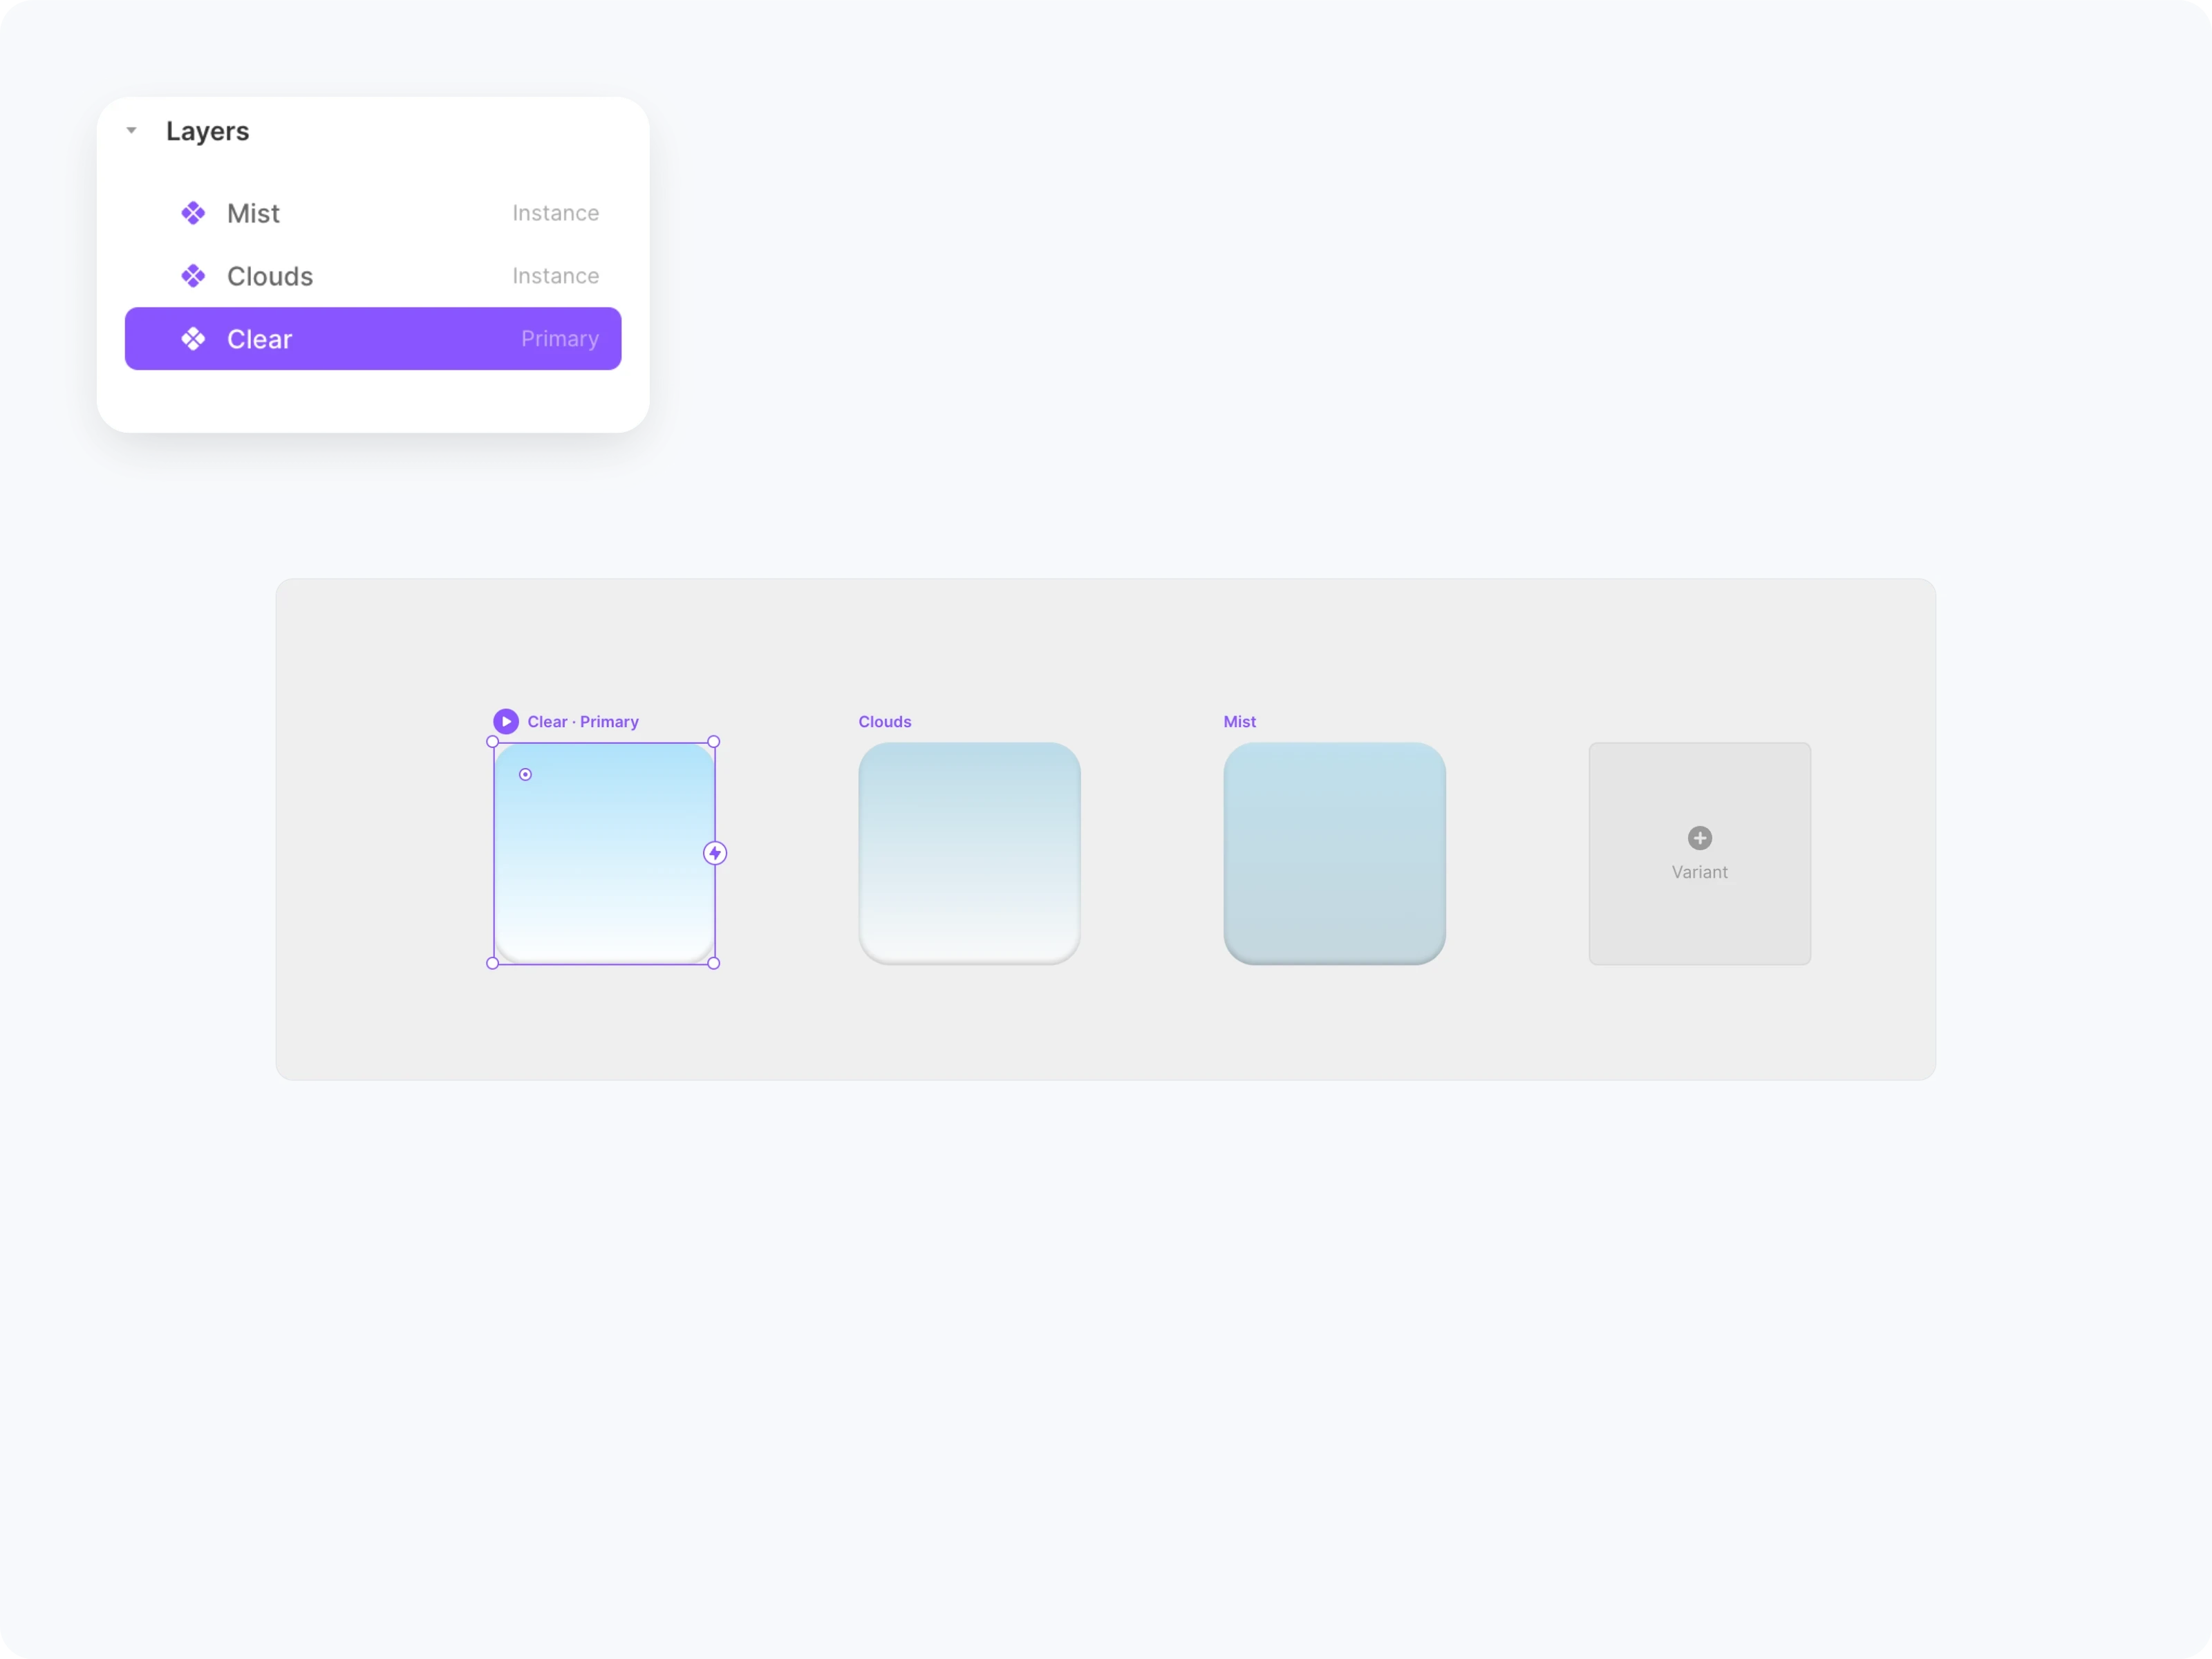
Here I've used three weather as an example, you can skip the process of designing the UI by copying this component directly into the Framer.
Override
Create a new Override file and import React and OpenWeatherAPI. we can find out how to use the package in the NPM page of [openweather-api-node].
import * as React from "react"
import OpenWeatherAPI from "openweather-api-node"
import type { ComponentType } from "react"
export function Temperature(Component): ComponentType {
    return (props) => {
        const weather = new OpenWeatherAPI()
        const [data, setData] = React.useState({ weather: "", tempture: 0 })
        return <Component {...props} />
    }
}
As we are using the OpenWeather API, we need to get a Key to allow OpenWeather to allow us to access the data. Before we can do that, let's configure Override completely and then go to OpenWeather and request the Key.
Getting the current temperature
We can get the current weather data by using "weather.getCurrent()" in which " weather.temp.cur" will give us the current temperature data.
 React.useEffect(() => {
            weather.setKey("Your Key Here")
            weather.setLanguage("en")
            weather.setUnits("metric")
            weather.setLocationByName("Shanghai")
            weather.getCurrent().then((data) => {
                setData(data.weather.temp.cur)
            })
        }, [])
The API is more precise (it is accurate to a few decimal places), so we can use "toFixed(0)" to display only integers.
export function Temperature(Component): ComponentType {
    return (props) => {
        const weather = new OpenWeatherAPI()
        const [data, setData] = React.useState(0)
        React.useEffect(() => {
            weather.setKey("Your Key Here")
            weather.setLanguage("en")
            weather.setUnits("metric")
            weather.setLocationByName("Shanghai")
            weather.getCurrent().then((data) => {
                setData(data.weather.temp.cur)
            })
        }, [])
        return <Component {...props} text={data.toFixed(0)} />
    }
}
Getting the current weather
Again, "weather.main" provides the name of the current weather, e.g. clear, clouds, mist, rain, etc. We use this data to display the current weather and control **Variant**.
export function Weather(Component): ComponentType {
    return (props) => {
        const weather = new OpenWeatherAPI()
        const [data, setData] = React.useState("Loading")
        React.useEffect(() => {
            weather.setKey("Your Key Here")
            weather.setLanguage("en")
            weather.setUnits("metric")
            weather.setLocationByName("Shanghai")
            weather.getCurrent().then((data) => {
                setData(data.weather.main)
            })
        }, [])
        return <Component {...props} text={data} variant={data} />
    }
}
API Key
First we need to register an [OpenWeather] account and then go to [OpenWeather/My API keys] to see the API Key. if you don't see the Key, you can generate a new one on the right hand side.
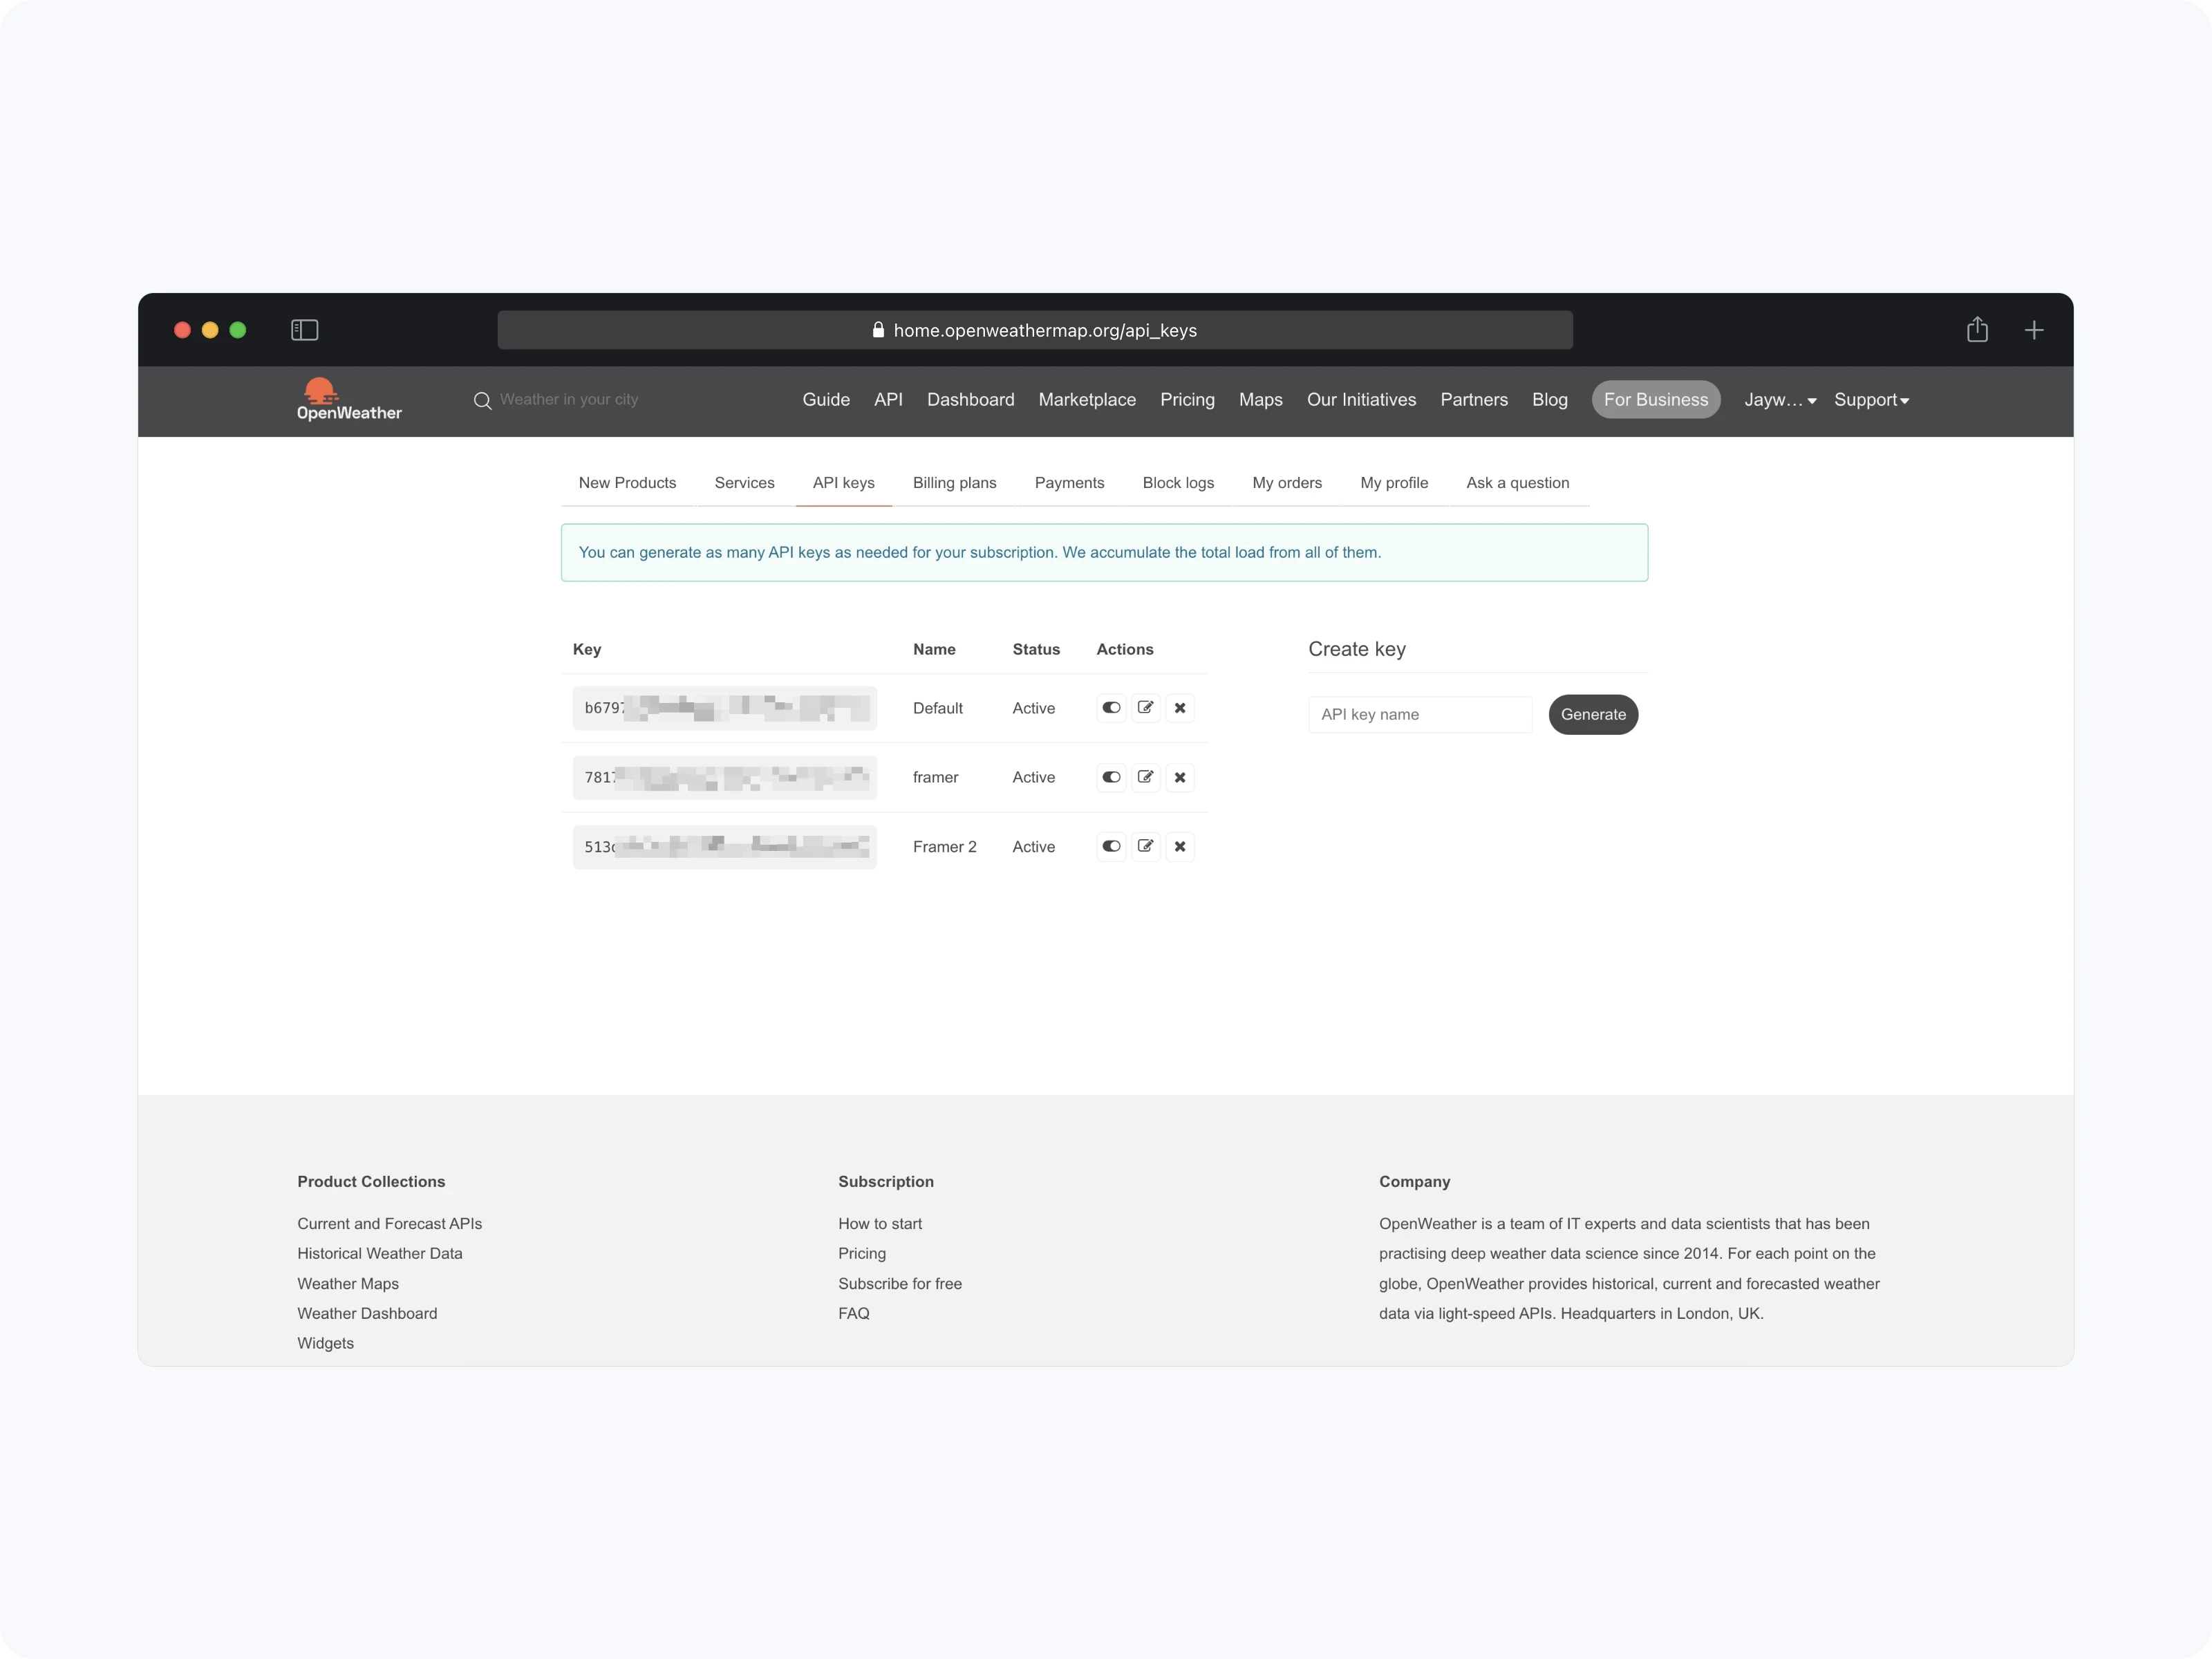
Paste the key directly into "weather.setKey("Your Key Here")".
        React.useEffect(() => {
            weather.setKey("b679............")
            weather.setLanguage("en")
            weather.setUnits("metric")
            weather.setLocationByName("Shanghai")
            weather.getCurrent().then((data) => {
                setData(data.weather.main)
            })
        }, [])
Finally, connect the Override to the layer. We have connected “Override/Tempture” to the temperature text and “Override/Weather” to the weather text, logo and background.
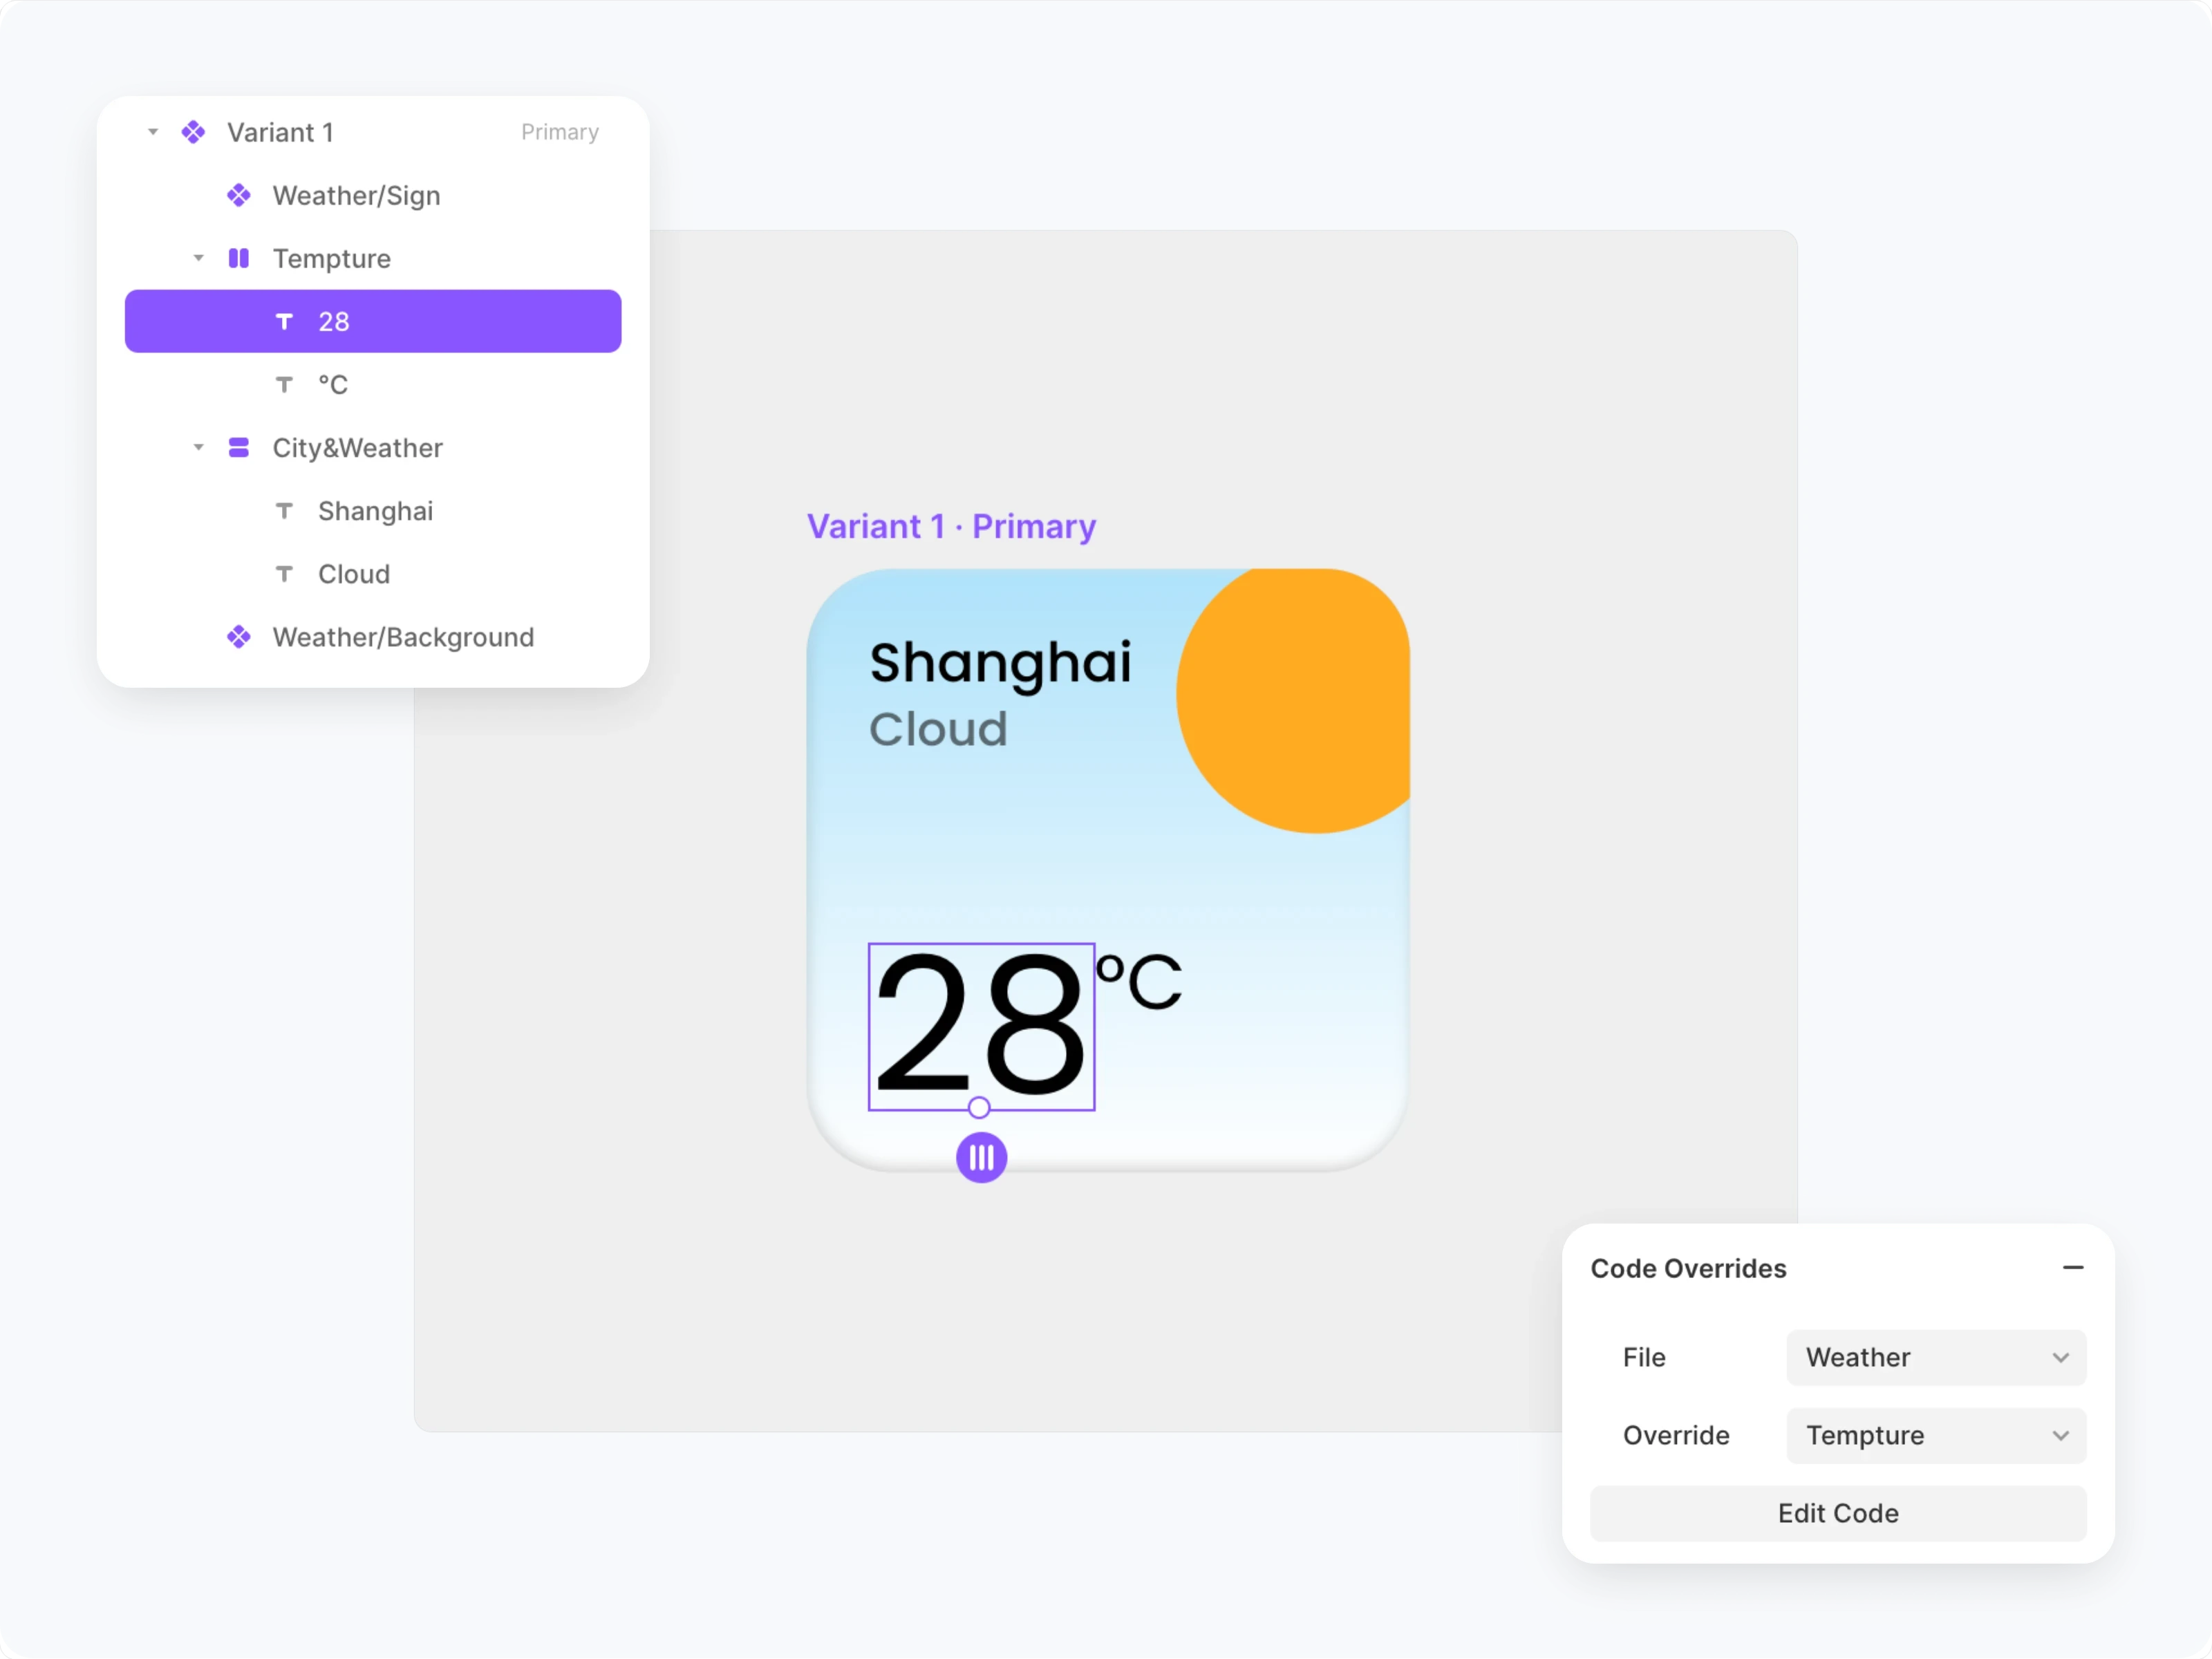
Previewing the component, you can see that all the data has started to change and a realistic weather widget is now complete.
The Full Code
import * as React from "react"
import OpenWeatherAPI from "openweather-api-node"
import type { ComponentType } from "react"
export function Temperature(Component): ComponentType {
    return (props) => {
        const weather = new OpenWeatherAPI()
        const [data, setData] = React.useState(0)
        React.useEffect(() => {
            weather.setKey("Your Key Here")
            weather.setLanguage("en")
            weather.setUnits("metric")
            weather.setLocationByName("Shanghai")
            weather.getCurrent().then((data) => {
                setData(data.weather.temp.cur)
            })
        }, [])
        return <Component {...props} text={data.toFixed(0)} />
    }
}
export function Weather(Component): ComponentType {
    return (props) => {
        const weather = new OpenWeatherAPI()
        const [data, setData] = React.useState("Loading")
        React.useEffect(() => {
            weather.setKey("Your Key Here")
            weather.setLanguage("en")
            weather.setUnits("metric")
            weather.setLocationByName("Shanghai")
            weather.getCurrent().then((data) => {
                setData(data.weather.main)
            })
        }, [])
        return <Component {...props} text={data} variant={data} />
    }
}
Content
Real data in Framer: Weather
Nov 1, 2022
In the second post, we will use real API data to make a weather widget. We will get the API from OpenWeather and then use it by importing “openweather-api-node” in Override, using the NPM import feature of Framer.
The Weather UI
First, we need to create a UI for the weather component, which contains the city, weather, weather symbols, temperature and background. In this case, we will create the weather symbol and background as separate components, so that we can easily modify the style of the widget.
Weather symbol and background
Create weather symbols and backgrounds as separate components and name **Variant** the corresponding weather (these weather names are the same as the names provided by the API).
Here I've used three weather as an example, you can skip the process of designing the UI by copying this component directly into the Framer.
Override
Create a new Override file and import React and OpenWeatherAPI. we can find out how to use the package in the NPM page of [openweather-api-node].
import * as React from "react"
import OpenWeatherAPI from "openweather-api-node"
import type { ComponentType } from "react"
export function Temperature(Component): ComponentType {
    return (props) => {
        const weather = new OpenWeatherAPI()
        const [data, setData] = React.useState({ weather: "", tempture: 0 })
        return <Component {...props} />
    }
}
As we are using the OpenWeather API, we need to get a Key to allow OpenWeather to allow us to access the data. Before we can do that, let's configure Override completely and then go to OpenWeather and request the Key.
Getting the current temperature
We can get the current weather data by using "weather.getCurrent()" in which " weather.temp.cur" will give us the current temperature data.
 React.useEffect(() => {
            weather.setKey("Your Key Here")
            weather.setLanguage("en")
            weather.setUnits("metric")
            weather.setLocationByName("Shanghai")
            weather.getCurrent().then((data) => {
                setData(data.weather.temp.cur)
            })
        }, [])
The API is more precise (it is accurate to a few decimal places), so we can use "toFixed(0)" to display only integers.
export function Temperature(Component): ComponentType {
    return (props) => {
        const weather = new OpenWeatherAPI()
        const [data, setData] = React.useState(0)
        React.useEffect(() => {
            weather.setKey("Your Key Here")
            weather.setLanguage("en")
            weather.setUnits("metric")
            weather.setLocationByName("Shanghai")
            weather.getCurrent().then((data) => {
                setData(data.weather.temp.cur)
            })
        }, [])
        return <Component {...props} text={data.toFixed(0)} />
    }
}
Getting the current weather
Again, "weather.main" provides the name of the current weather, e.g. clear, clouds, mist, rain, etc. We use this data to display the current weather and control **Variant**.
export function Weather(Component): ComponentType {
    return (props) => {
        const weather = new OpenWeatherAPI()
        const [data, setData] = React.useState("Loading")
        React.useEffect(() => {
            weather.setKey("Your Key Here")
            weather.setLanguage("en")
            weather.setUnits("metric")
            weather.setLocationByName("Shanghai")
            weather.getCurrent().then((data) => {
                setData(data.weather.main)
            })
        }, [])
        return <Component {...props} text={data} variant={data} />
    }
}
API Key
First we need to register an [OpenWeather] account and then go to [OpenWeather/My API keys] to see the API Key. if you don't see the Key, you can generate a new one on the right hand side.
Paste the key directly into "weather.setKey("Your Key Here")".
        React.useEffect(() => {
            weather.setKey("b679............")
            weather.setLanguage("en")
            weather.setUnits("metric")
            weather.setLocationByName("Shanghai")
            weather.getCurrent().then((data) => {
                setData(data.weather.main)
            })
        }, [])
Finally, connect the Override to the layer. We have connected “Override/Tempture” to the temperature text and “Override/Weather” to the weather text, logo and background.
Previewing the component, you can see that all the data has started to change and a realistic weather widget is now complete.
The Full Code
import * as React from "react"
import OpenWeatherAPI from "openweather-api-node"
import type { ComponentType } from "react"
export function Temperature(Component): ComponentType {
    return (props) => {
        const weather = new OpenWeatherAPI()
        const [data, setData] = React.useState(0)
        React.useEffect(() => {
            weather.setKey("Your Key Here")
            weather.setLanguage("en")
            weather.setUnits("metric")
            weather.setLocationByName("Shanghai")
            weather.getCurrent().then((data) => {
                setData(data.weather.temp.cur)
            })
        }, [])
        return <Component {...props} text={data.toFixed(0)} />
    }
}
export function Weather(Component): ComponentType {
    return (props) => {
        const weather = new OpenWeatherAPI()
        const [data, setData] = React.useState("Loading")
        React.useEffect(() => {
            weather.setKey("Your Key Here")
            weather.setLanguage("en")
            weather.setUnits("metric")
            weather.setLocationByName("Shanghai")
            weather.getCurrent().then((data) => {
                setData(data.weather.main)
            })
        }, [])
        return <Component {...props} text={data} variant={data} />
    }
}
Content
@2025 THE STAGE FOR JAY JI.
- 0
- 1
- 2
- 3
- 4
- 5
- 6
- 7
- 8
- 9
- 0
- 1
- 2
- 3
- 4
- 5
- 6
- 7
- 8
- 9
@2025 THE STAGE FOR JAY JI.
- 0
- 1
- 2
- 3
- 4
- 5
- 6
- 7
- 8
- 9
- 0
- 1
- 2
- 3
- 4
- 5
- 6
- 7
- 8
- 9
@2025 THE STAGE FOR JAY JI.
- 0
- 1
- 2
- 3
- 4
- 5
- 6
- 7
- 8
- 9
- 0
- 1
- 2
- 3
- 4
- 5
- 6
- 7
- 8
- 9
@2025 THE STAGE FOR JAY JI.
- 0
- 1
- 2
- 3
- 4
- 5
- 6
- 7
- 8
- 9
- 0
- 1
- 2
- 3
- 4
- 5
- 6
- 7
- 8
- 9
@2025 THE STAGE FOR JAY JI.
- 0
- 1
- 2
- 3
- 4
- 5
- 6
- 7
- 8
- 9
- 0
- 1
- 2
- 3
- 4
- 5
- 6
- 7
- 8
- 9